EWP Option Strategies – Part 1
EWP Option Strategies – Part 1
Summer school is now officially in session – everyone please find their desks – Hamster, take your feet off the table. And no, it’s not the School of Rock, sorry guys.
Alright, time to get serious. The following post is excerpted from the Elliott Wave International (EWI) eBook, How to Use the Elliott Wave Principle to Improve Your Options Trading Strategies — Vertical Spreads. Heck – Bob, couldn’t you think of a shorter title? 😉
I found the eBook to be such a valuable resource that I requested EWI allow me to excerpt a series of articles from it. The idea of course is to introduce you folks to more complex option trading strategies, to encourage debate, and to hopefully put them into context with the wave counts presented here as well over at EWI. After all, it’s one thing to develop an understanding where we are in the wave cycle – but knowing how to profit at each stage is quite another story.
Simple example: Let’s say the market just dropped off the plate and doesn’t find a bottom until a week or two later. Blood is in the streets, VIX is sky high, but your analysis tells you that conditions are heavily oversold and that a bounce is imminent. What do you do? Buy a bunch of calls? Well, that would potentially be a bad trade – even if the market moves in your favor. And by the time this course is over you will know why.
This is the first chapter of the book which deals with bull call spreads and bear put spreads – both are also referred to as debit spreads. EWI has also graciously agreed to make the full eBook available for free to all Evil Speculator readers until the conclusion of this series. So go ahead and download it for free if you want to study ahead – however I would appreciate it if we kept all discussions limited to the current chaper.
Bull Call Spread and Bear Put Spread
The first strategy that we will look at is the bull call spread.
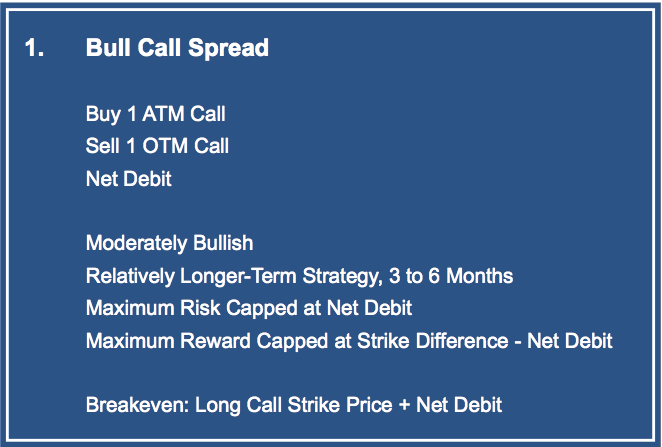
To start with, I’ll give the standard definition seen in most options books or websites, as underscored by the abstract above: A longer-term strategy that lasts three to six months, this spread involves buying an at-the-money (ATM) call, and selling an out-of-the-money (OTM) call, resulting in a net debit. Time is of the essence. Maximum risk is capped at the net debit, and maximum reward is capped at the difference in strikes less the net debit. We have one break-even level — the long call strike plus the net debit. As we go along, we may deviate from this ideal with respect to the time until expiration, based on Elliott wave analysis (of course, for positive reasons, not for negative ones).
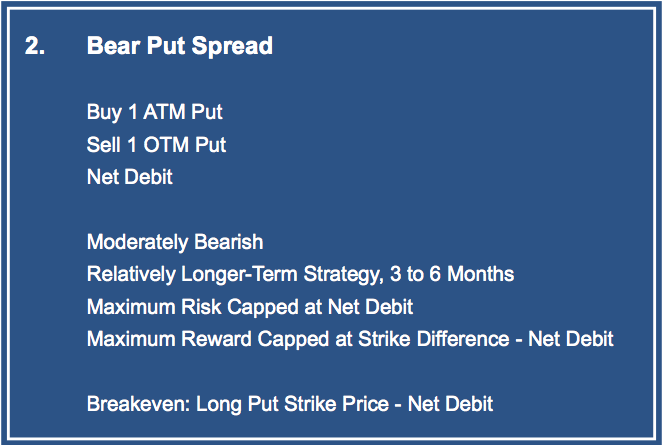
The bearish counterpart is the “bear put spread” — same type of structure, except this time you’re betting on a decline in prices. The thumbnail sketch above fills in the rest: Buy an at-the-money put and sell an out-of- the-money put, resulting in a net debit. Maximum risk is capped at the net debit. And maximum reward is, again, equal to the difference in the two strikes less the net debit. The breakeven is the long put strike price less the net debit.
There is one key consideration regarding these strategies — they involve limited moves. By selling the put or call at a strike that’s further out of the money, we technically give up certain profit potential. However, since we’re predicting that the move is limited, we’re not really giving up anything, all the while reducing cost.
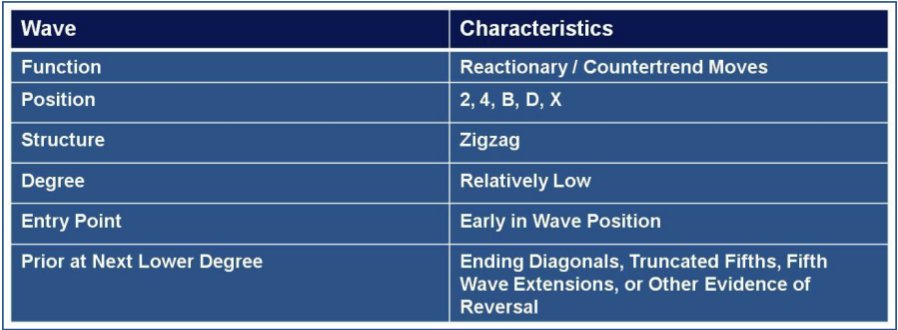
Now, let’s look at these strategies from an Elliott wave perspective. This table features the optimal Elliott wave attributes for using the bull call spread and bear put spread — key word being optimal. You could use these strategies in other situations; these scenarios simply provide an ideal context. The left-hand column names six categories of wave type. And the right-hand side, their corresponding characteristics.
Before we get to an actual trade setup, we must first examine the list’s individual parts:
- wave function
- position
- structure
- degree
- entry point
- prior wave at next lower degree.
Function: From an Elliott wave standpoint, vertical spreads are best suited for limited moves such as those associated with reactionary or countertrend moves. What does that mean in terms of wave position? This would be the second and fourth waves within an impulse wave; a B wave within a zigzag, a flat or a triangle; the D wave of a triangle; and the X wave in a double zigzag, triple zigzag, or double-three, triple-three combination.
Again, why are these wave positions good for these strategies? They’re limited. These countertrend moves can go only so far. Wave two always retraces less than 100% of wave one. Wave four can never end in the price territory of wave one. A B wave in a zigzag can never go beyond the start of wave A. And wave D in a contracting triangle can’t go beyond the previous wave B. On your X wave, however, the limitations are in terms of guidelines, not rules: the B wave in a flat could go beyond the start of A, and in some combinations the X wave could go beyond the start of wave W or wave Y.
The best structure for these strategies is a zigzag, because we’re looking for a sharp move. The ideal situation would be for the price of the underlying asset to go right to the strike price of the out-of-the-money call or put that we sold, right at the expiration date. But certainly, it’s better to have purchased more time than we need than to run out of time.
Preferably, the zigzag would occur at a fairly low degree. Why do I say that? This is because we’re looking for relatively small moves here. We’ve limited our profit potential. We’ve limited our upside potential. It’s hard to put an exact wave label in terms of Minor, Minute or Primary, because those can vary. But at the extremes, we’re not looking for Cycle or Supercycle degree with these strategies. We want to enter these strategies early in the wave position. Again, time is of the essence. We’re buying basically at-the-money. We want to get in as
soon as possible to take advantage of this move.
Finally, you need evidence that strongly suggests the entry point will precede a turn. For example: Before you go into a wave two or four, it would be ideal to see the previous wave at one lesser degree (i.e. the final leg of the preceding wave one or three) unfold as an ending diagonal, a truncated fifth, or a fifth wave extension — all patterns that imply an immediate and swift reversal in trend. If you don’t see any of these game-changers in the previous wave at one lesser degree, then you have to spot some other indication of change. This could be a reversal on the weekly bar chart or a completed five waves in the fifth wave. Whatever the scenario, there should be some evidence of a trend change before you can enter into the position. The one rule that is essential to applying this strategy and all the others in this eBook is this: Always rely on Elliott wave rules and guidelines.
Mole here again: Alright, I am going to stop right here to make sure all this sinks in thoroughly. It’s essential you guys completely grasp the basics before we press on. Digest this for a while and next Friday it’ll be time to see an example of how to use these strategies on an actual price chart.
Cheers,
Mole


